
How to Schedule Your Instagram Reels in Advance
Do you want to schedule your Instagram reels to get uploaded at your specified time automatically? Earlier, this was only possible with the help of some third-party scheduler apps like Hootsuite, Buffer, etc.
Schedule Instagram reels
After a very long time, Instagram has finally integrated its own reel scheduler tool, so you don’t have to rely on third-party apps anymore. Now you can set your reels to upload at your scheduled time right away from the Instagram app.
Growing your social media presence and engagement requires you to deliver your content on time. Scheduling can help you create an automated stream of content in advance so you can focus more on content creation rather than worrying about uploading your reels.
In this article, we will show you how to schedule your Instagram reels using the built-in scheduler tool. Let’s get started!
Steps to schedule your Instagram reels
1. Switch your Instagram to Creator account
The reel scheduler tool is only available to users who have creator account on Instagram. If you don’t have that one, you can switch your personal profile to creator account anytime. Here is what you need to do:
- Open the Instagram app and go to your profile tab. Simply, click on your profile picture icon in the bottom-right corner.
- Now tap Edit Profile under your bio and then click Switch to Professional account option. Alternatively, you can go to Menu > Settings > Account and find the same option there.
- Tap Continue button to skip the introduction slides. After that, you will be asked to choose a category for your account.
- Choose any category that describes you best and tap Done button.
- Now you have to choose between Creator and Business account.
- Select Creator and click Next to continue. Complete the rest of the steps to set up your new professional account.
2. Create and edit your Instagram reel
The second step is to create and edit your Instagram reel. Simply, open the Instagram app and tap + (plus) button in the upper-right side. After that, choose Reels option. Another way to reach the same place is by going to the Reels section from your Home page and then clicking Camera icon in the top-right corner.
This will open up the Instagram camera. Now you can shoot a new video for your reel or select an existing video from your camera roll. Tap Next button to continue. After that, complete the editing process. Add music, apply filters, write a text, and more. Once the editing part is done, tap Next button again.
3. Schedule your Instagram reel
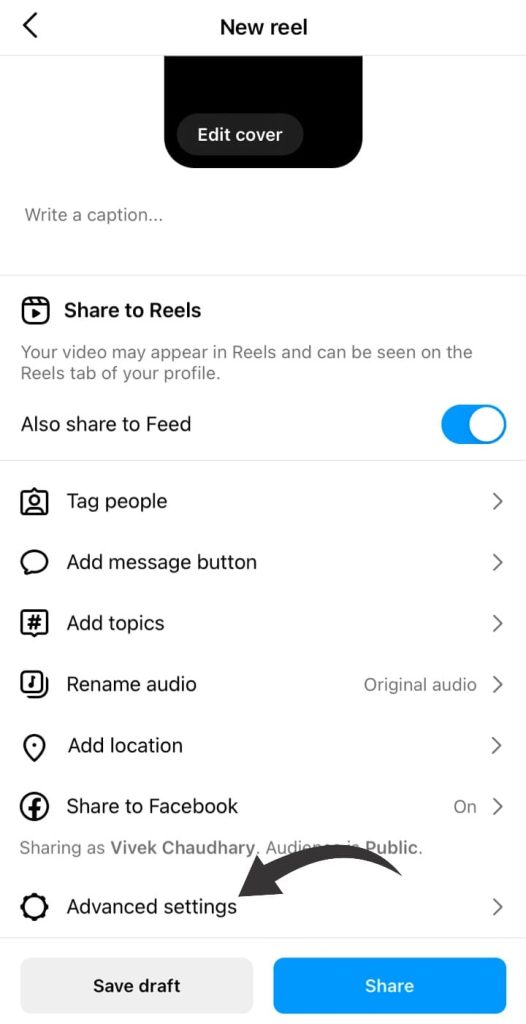
In the next screen, you can add a caption to your Instagram reel and choose a cover photo. To schedule your reel, click Advanced settings option at the end.
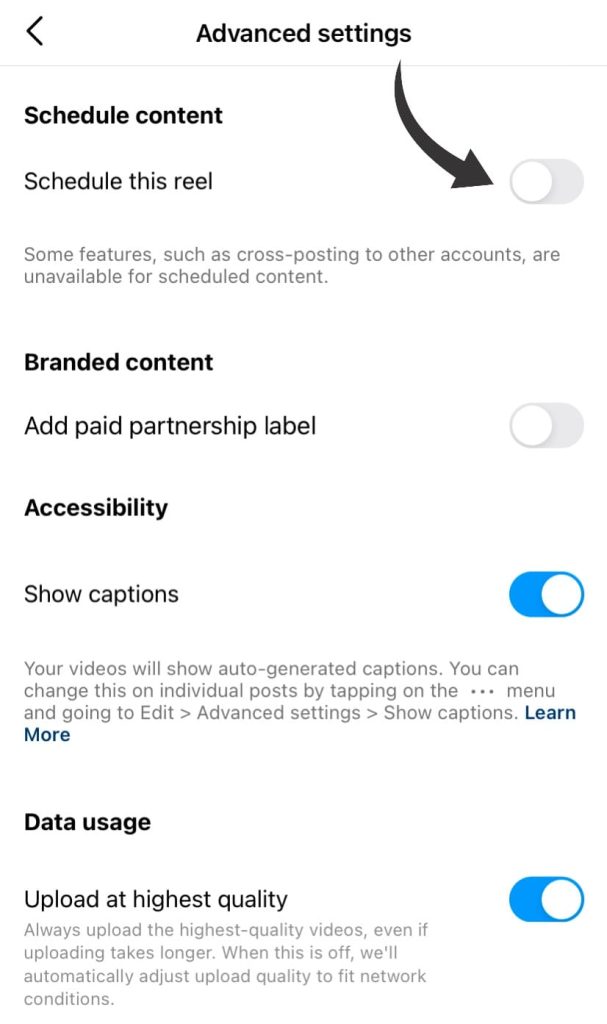
Here you will find a new section titled Schedule content. Enable the toggle button that says Schedule this reel.
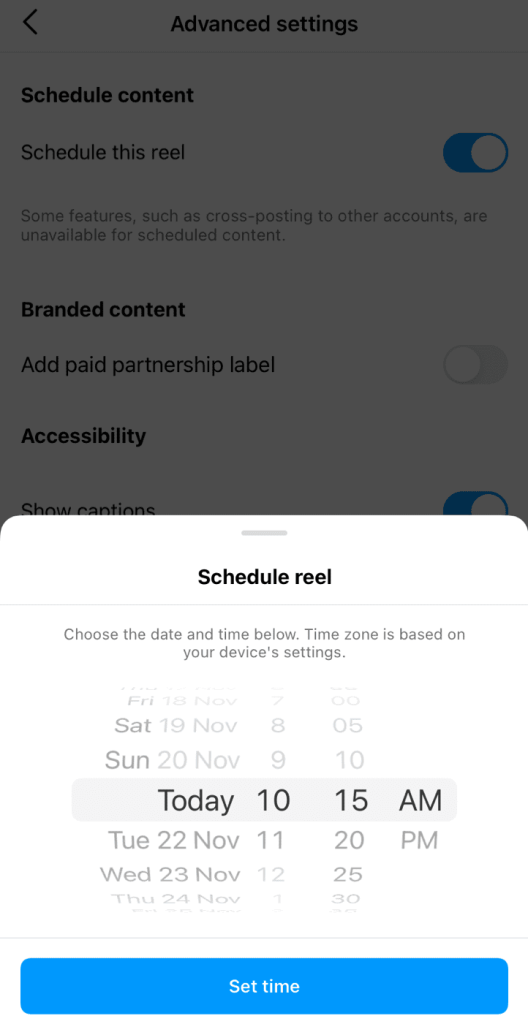
After that, set the desired date and time when you want to publish your reel. Time zone is based on your device’s settings. Click Set Time button to save the changes.
4. Upload your Instagram reel
Click back icon in the upper-left corner to go back to previous screen. Then tap Schedule button. That’s it! You have successfully scheduled your Instagram reel. It will be published automatically at your specified time. Note that if you have cross-platform sharing enabled, it won’t work with scheduling. You can read more about this in our previous article on how to share your Instagram reels to Facebook automatically.
Frequently asked questions
How to review your scheduled Instagram reels?
To review your schedule reels, just go to your Instagram profile and tap menu button (three parallel lines). After that, select Scheduled content option from the menu. This is where you will find all your scheduled reels.
How to schedule posts on Instagram?
Just like reels, you can also schedule normal posts on Instagram in the same way. You should have a Creator account. While sharing your post, click Advanced settings at the end and then enable Schedule option. Then you can select the date and time whenever you want to publish your post.
How to change scheduled date and time for your Instagram reels?
It’s possible to change the date and time of your scheduled reel. Simply, open your Instagram profile and go to Menu > Scheduled content. After that, click three dots on the reel whose date and time you want to change and then select Reschedule option.
How to post scheduled Instagram reels instantly?
You can also post your reels manually before their scheduled time. To do this, go to your profile > tap menu > click Scheduled content and then tap three dots on your reel. After that, click Share now option from the pop-up menu.
Couldn’t find Schedule option in Advanced settings?
If you couldn’t find Schedule option in Advanced settings while sharing your reels, it is probably because you have a personal account on Instagram. This option is only available to people who have a Creator account. Just switch your profile to creator account and it will be available to you.
Planning your Instagram reels in advance
Consistency is the key to success. This popular quote applies to the growth of your Instagram reels also. It’s important to plan your content ahead of time and post it at the right time when the engagement is highest. Scheduling can help you manage your content more efficiently. Through this article, you have learned how to schedule your Instagram reels. If you have any questions on this topic, feel free to share them in the comments below.